 Do you remember that the landscape and travel projects are much better on a travel tripod? I do it In addition to the concrete benefits of a best travel tripod, such as the camera and lens stability, I also appreciate the intangible benefits. What are they? I think a travel tripod slows me down. I have to think about the stand's position and its height. It forces me to judge the composition and its elements before pulling the trigger. As a result, I take fewer pictures with a much higher success rate with a travel tripod. I like each of my three photo tripod. At the same time, it is not always easy to choose the best photo tripod for your trips. Why? Because it's not the "best travel tripod". I'm sorry if I just burst your bubble! The only way to use and enjoy a tripod is to find the tripod that best suits your equipment, type of photography, travel habits and personal preferences. I tell you about experience: it can be difficult to choose the perfect model from hundreds of options. I know because I learned the difficult way. I bought my first Best Tripod for Photography, the most stable model on the market, based on a recommendation in a photographic magazine. It was big, heavy as hell, and I stayed in the luggage of my car because it was too heavy to carry. Since then I have learned my lesson. Now I approach methodically every method choice. I also developed my own system to simplify the selection process that had never been abandoned before. I hope to share my system to buying a tripod for your photographic needs, and I'm sure it will help you make the right decision. A tripod is nothing more than any other stand used in photography, but there are two specific requirements. It should be as small and light as possible without jeopardizing the main function: stabilize the camera and the lens. Bonus Tip: How to Assess Tripod Stability We all know that the most important function of a photo tripod is the stability of our photographic equipment. However, stability is not easy to quantify, so it is almost impossible to assess the stability of a particular photo tripod model before it is purchased. Even after the purchase, you have to control the travel tripod through various travel photographs to understand how stable it is. Although I generally trust the user's views in the hope that they are objective and accurate, I have another method that gives me more clues about the stability of a travel tripod. I always remember the value of the load capacity during my investigation. The higher the load capacity, the more stable the travel tripod will be. When buying a tripod the cargo capacity was decisive.
0 Comments
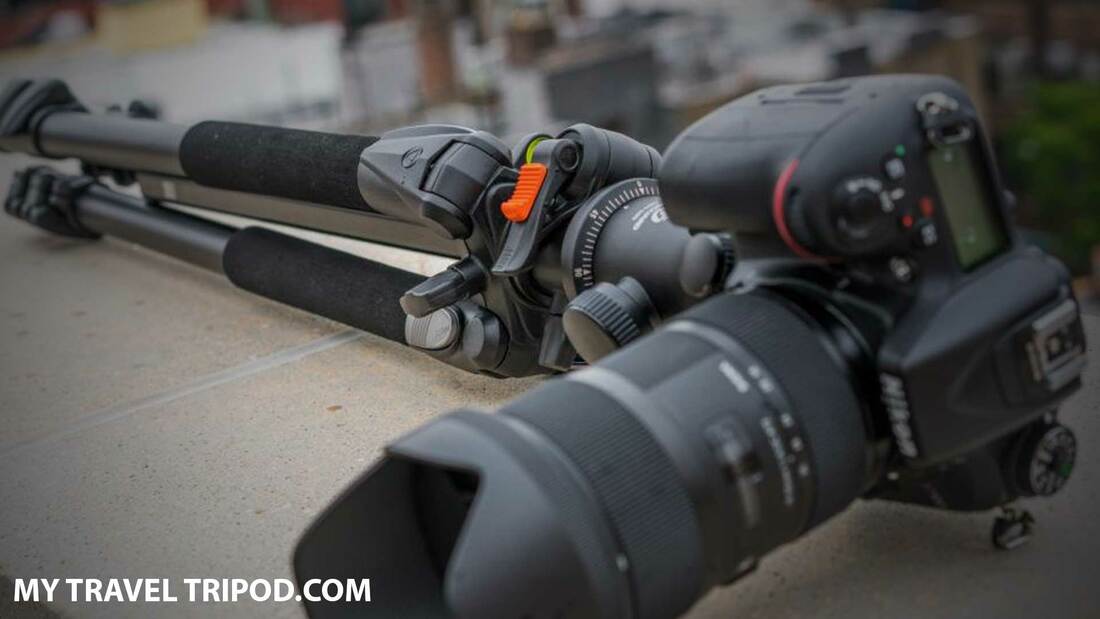 When you buying a tripod, there are two important things to consider: Never buy a photo tripod bigger than you want and make sure you have one! This guide will help you choose the best Best Tripod for Photography, or the best places, to find out what you need to explore the many opportunities for photography.
For ISO, marketing for modern cameras promotes everything, but the ISO value is often so high that you do not need a photo tripod. If we are fortunate to have a high ISO content, does it mean that you can completely remove the racks from the list of important images? Obviously not! It does not matter what marketing can tell you, as it will not be possible to make long commitments without the support of a three-legged travel tripod. But with higher ISO sensitivity, you can keep the camera in several situations. But this only works if you want to use medium to high speed. If you have less than 1/60 seconds, a travel tripod is a good deal for the pictures you want to create. Why do I need a Best Tripod for Photography? The Best Tripod for Photography is not just a medium when the light is dimmed and you need to use a faster shutter speed. You can also be your friend if you open the opening for creative reasons, add a strongly neutral filter or want a lower depth of field. If you want to use a slower shutter speed, it is important to record some of the time in a single image. Similarly, you can create multiple images in Studio that record the subject in exactly the same location. Another common example is where you want your camera to record multiple images, as many people do when creating time slots. Benefits of a tripod: A photo tripod should not be classified as low light support, or as a studio photograph or placement tool. A photo tripod is a creative tool as it expands the capabilities of the camera, even if you sometimes do not use the stand to support the camera. Tripod is not just for camera support, but should not only be used. For example, some photographers use a photo tripod to help a reflector or diffuse when photographing flowers or macro images. They can also be used for flashing and situation equipment, such as acrylic panels or LED panels. This gives the photographer the opportunity to move much more in search of the perfect angle. As you can see, creative tools stand that make it easier for you to control the light, not just low light conditions. Without a tripod, many photographs of the past would not exist.  With very few exceptions, the main reason for the photography must be clear: not necessarily the full picture, but the subject. Even if you want the subject to be unclear to give the impression of movement, the background should be clear. With a travel tripod you get the clearest pictures. The image may be blurred in any of the following ways: The focus is incorrect, the camera is moving or the subject is blurred. Here's how to make a difference:
For the most part, you can only hold the camera by hand. Of course, it is much faster and gives you time to take a look at yeti before it disappears. The major drawback of the travel tripod is that they delay you. Maybe the clouds will move when you turn them on or the sun goes down or those who wait will drill you. The big advantage of the lightweight tripod is that they delay you. You have time to see and move the box in the foreground before taking the picture. So when should you use a travel tripod?
Choose a lightweight Tripod: Different lightweight tripod are suitable for different situations.
If you do not have a Lightweight Tripod: This is by far the second best option, but it is inevitable that you will at least catch temporarily without standing.
 Sure it's time to take pictures by hand. If you find the travel tripod for your trip, your photographic experience will be even more fun.
Remember to keep photographic equipment as light as possible while on the move. However, using a lightweight tripod can be the most important accessory in your backpack, especially if you want to improve your photographic skills. HOW TO SELECT THE BEST TRAVEL TRIPODS: SIZE: A lightweight tripod that glides easily in the bag or back makes the difference. During the journey, it is constantly in the air, flying from one destination to another. Therefore, it is always easier to take a compact travel tripod that can take anywhere, even in the aircraft's cockpit. The Best Tripod for Photography shelf should have a maximum of 60 cm when folding. Ideally look for one that folds up to 50 cm (20 inches). Why? It is not only easier to transport a compact travel tripod, but if you travel to another destination and do not want to check your camera bag at the airport, you must comply with the permitted dimensions. WEIGHT: You also need to think about the weight of the travel tripod. Is it easy to take it? Previously, the stables were made of aluminum. They were heavy and bulky and it was very difficult to travel. As a result, manufacturers have in recent years begun to market the places made of titanium and carbon fiber camera tripod. Although these travel tripod are much easier and easier to transport, they are also more expensive. When choosing the travel tripod for the trip, you should also decide if the weight is a crucial factor for you. If you don't travel a lot and sometimes need to take the place for the night, you can probably save a few hundred dollars if you have a heavy but cheaper aluminum rack. Maximum weight that can hold it: The lightweight tripod cannot support the camera's weight. As a result, your photos may become blurred due to the camera's motion caused by the movement of the lightweight tripod. When looking for the best travel tripod, make sure you get the maximum weight the stand can carry and examine the equipment it is wearing. An ideal stand, including the head, should weigh about 4 kg and support the camera's weight on the lens. TRIPOD HEAD: Some places contain the head, others are available separately. When looking for the best travel spot, look for the ball's joints as they are more compact and tend to be lighter than three-way balls. 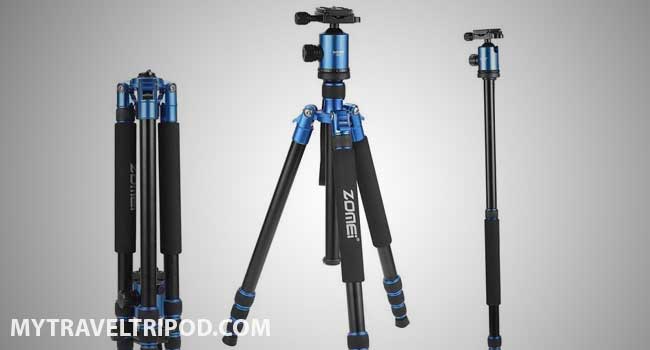  I have just returned from a trip to Europe as a photographer, and I have received useful information that can be useful for photographers, amateurs or professionals planning a trip. This article is about acquiring necessary equipment, transportation and the right time at the right time. If you want a collection of professional vacation photos or group tours in a remote location, be sure to consider some of these issues. My Personal Equipment Preparation: For many shots I have gradually developed a strategy for traveling easily and comfortably with a sufficient number of photo equipment. On long trips I usually take two cameras with me; A digital digital SLR with a lens and a small digital camera that shoots. For the SLR camera I take two goals; a mid-range telephoto lens (70-200 mm) and a fixed wide-angle lens (24 mm). With these two goals you will be ready to take effective pictures of people and beautiful landscapes. In addition to the cameras, I always have a form of lightweight tripod, either mini or large (for travel, make sure the travel tripod is made of lightweight material). For storage, I use a larger memory card for the SLR camera and generally a smaller memory card for the compact camera. I also recently purchased an iPod. When memory cards are full, I easily charge them to my iPod. Carrying the Equipment: On long journeys with many opportunities to take pictures, I only use a shoulder bag for my photographic equipment. I hold the SLR camera in the bag with the extra lens that I do not currently use. Then I wear the smallest compact camera in my pants or shorts. The newer digital cameras have evolved so much that sometimes the pictures I get from this camera are better than those from the SLR cameras. If you have a small camera in your pocket, you are always ready to take spontaneous pictures (usually photographs of people). This way, you don't always have to hang a large camera around your neck, making it an immediate destination for professionals in many places. I cannot emphasize the importance of a lightweight tripod. I really think the best pictures I took were at dusk or at night, with slow shutter speed thanks to the use of a travel tripod. It is also very useful for architectural images of many cathedrals and buildings with large and poorly lit areas. Techniques for Professional Travel Photos: Of course, read about composition, exposure, shutter speed and aperture for effective pictures. But I know that many other subjects are very important for holiday photos. For pictures of landmarks or landscapes, make sure you have a close-up and a background to give your viewers a good idea of how it would be to visit the site itself. You should also be sure to record many images on a scene with different combinations of exposure settings and angles. Normally I only find a picture of 10, which I really like, even though the ten pictures were taken in exactly the same place. Keep in mind that you will surely make sure you get at least one good picture of each item, as it will not be back soon. To get pictures of people it is important to get pictures of the people who accompany you on the journey, as well as pictures of the people who live in the area you visit. When people look at pictures after a trip, they like to see pictures of their visitors who visit specific places, and their close-ups have fun or focus mainly on their facial features. During the events I undertake to follow a journey and prepare a slide show, I noticed that the pictures that people liked most about were a fun moment or a person who did something stupid as he wanted. To make an ignorant tourist. They also enjoyed seeing pictures of interesting people they met in a strange environment. For example, on my last trip to Germany, I took many pictures of crazy football fans, who cheered and waved flags on the streets. There is a seemingly endless amount of things you can learn about travel photography, but I would say that the most effective technique is to take many pictures and many pictures.   The first belt driven ceiling fans come from the United States. They were already used in large offices and restaurants in the United States from 1860 to 1870. They are run by a series of belts connected to a turbine running on water jets. Although they were large with several belts, they were popular at the time. These belt driven ceiling fans only had two wings.
The first diy belt drive ceiling fan powered by an electric motor were manufactured in 1882 and continued until the air conditioner fired them. diy belt drive ceiling fan was popular. The first belt ceiling fan only had two knives and during the First World War they were updated and made with four knives. These were more efficient and less noisy. Although the belt ceiling fan are of better quality, the climate control system is improved during this time, which means that the ceiling fan can retreat. Belt driven ceiling fans from Fanimation series is another gem with attractive details and ornaments. The belt driven ceiling fans is the guaranteed centerpiece of the room and is an excellent addition to an interior design, whether it be a theme prize or your own living room at home. The highlight of the belt driven ceiling fans is undoubtedly the elegant belt. The unit can be mounted horizontally or zigzag. Each engine can handle up to three sets of plywood sheets, woven bamboo or natural palm leaves. The motor is driven by a belt up to 9.1 meters long. The strap can be cut to a shorter size if needed. With belt driven ceiling fans you can circulate the air in long thin spaces or at angles when the belt is shortened and placed diagonally. The color and position of the engine, material and height of the blade and sets of 1 or 4 belt driven ceiling fan with light can be individually selected. Historic look – State-of-the-art components
You need the following components for one complete fan unit:
 The latest technological innovations have paved the way for reactivation of led solar landscape light.
solar powered led landscape lighting is sublime external light sources powered by photo-voltaic (P.V) modules. These panels are mounted on the lighting structure or connected to the mast. The photo-voltaic panel has a rechargeable battery that streams fluorescent lights or led solar landscape light all night. Most solar panels automatically detect led solar light outdoor through a light source. These may light several consecutive nights, even if solar power is not available for a few days. Today, many users choose led solar light outdoor for many different reasons. The Advantage of LED Solar Landscape Light: Led solar landscape light is independent of the public network, which reduces operating costs. This means they are wireless lights and not connected to your power supplier. The solar landscape spot lights are dependent on the heat energy emitted by the sun and stored as much as possible throughout the day. Led solar landscape light requires less maintenance than ordinary lamps. These are less likely to overheat. Because the solar cables do not have external cables, the risk of accidents is minimized. Many accidents occur when repairing street lighting by personnel. These can be distortion or electric shock. The led solar landscape light are environmentally friendly because the solar panels are based solely on the sun and the contribution to the carbon footprint is eliminated. The led solar light outdoor parts can be easily transported to remote areas, making these solutions more efficient and practical for lighting problems. On the other hand, the led solar light outdoor has advantages, but also a number of disadvantages. These are some of the advantages over traditional lighting systems. Finally, just decide whether or not the benefits outweigh the disadvantages. The Disadvantage of LED Solar Landscape Light:Led solar landscape light requires a higher initial investment than conventional streetlights. This is actually the main reason why most people are not sure about switching to sun street. They consider the money they have to spend without taking into account the long-term benefits and the longest life of Led solar landscape light. Because they are not connected, they can easily be stolen. The risk of theft is relatively greater because the monetary value is higher than for conventional streetlamps. Snow or dust and moisture can be collected in horizontal photo-voltaic panels. This leads to a complete or reduced interruption in electricity production. As a result, Led solar landscape light should sometimes be controlled, especially if it is installed in areas exposed to extreme weather conditions, which can damage or reduce life. Rechargeable batteries should be replaced several times during the life of the headlights. This is in addition to the total cost of the life of the lighting system. Like other components, rechargeable batteries are exhausted. For this reason, you must add them to your maintenance cost. Having considered the advantages and disadvantages of using solar heaters, it is time to measure their general tools. Is it worth investing? But let me tell you that there are exact reasons why more and more people choose solar heaters. So why not try now? If you have any questions about the sun's lanterns, please contact us here. Dedicated staff will help you immediately.  Cuisinart toa-60 is an electric appliance that works both as an oven and as a toaster. It is a small unit that fits easily on the kitchen table or on the table. The Cuisinart toa-60 has become an integral part of every home and has gone from being a pure toaster to a multifunctional. Cuisinart toa-60 are available in various types and sizes and are manufactured by many brands in the market.
Body: Cuisinart toa-60 can be defined as "an electric appliance that functions as an oven and toaster and is small enough to fit on a table or kitchen". Toast is known as toast and other products that can be grilled can be called bread dough. The Cuisinart toa-60 main role is to fry the bread by heating it up. The heat is usually generated by passage of electricity through nichrome cables. The baking process is mainly aimed at reducing the water content of the bread, increasing the temperature and making it easy to boil the surface. However, electric ovens are not always used. Before developing these units, burnt bread was burned by placing it in a metal frame and holding it on fire or near the fire with a long-handled fork. The story of open flame toast goes back for at least 200 years, and people enriched it with a stick or knife and kept it burning. History of the Pastry: The concept of Cuisinart toa-60 was developed from electric toasters developed in the mid-nineteenth century. The first electric toaster was developed in 1872 by Maddy Kennedy. Crompton, Stephen J. Cook & Company, UK, distributed an electric toaster with a beating in 1893, but did not receive the expected answer. Therefore, there is no significant information about the Toast Museum. In 1905, Irishman Connor Neeson (1877-1944) invented Detroit and his employer William Hoskins (1862-1934) Chromel, an alloy that gave rise to the first high-strength cable. These cables are used in almost all of the first electric heaters. This alloy was patented in 1906 prior to the patent application for an electric toaster. George Schneider from Detroit American Electrical Heater Company was the first to order an electric toaster. In 1909, General Electrical's developed a patented electric toaster with the name D-12. The product from the electric heating company Hotpoint Pacific, which also covered the same market segment, had to defend itself. The first toaster was invented in 1910 by a person named William Hadaway, who built it to Westinghouse Corporation, which is still a leading bread maker oven manufacturer in the country. This was developed as a by-product from the electric furnace. Until then, the bread must be turned and baked manually. The 1919 pop-up toaster was patented by Charles Strite. In this type of electric toaster, the bowl is tossed after roasting. In 1925, Toastmaster began marketing a renovated version of Charles Strite toaster. It was the first domestic toaster to burn both sides of the bread at the same time. I had an hour and I could get out of the bread when it was ready. In 1926, this new version was very popular with the masses and became a house name. Up to a few decades ago, only bread could be shaken. With technical changes you can cut frozen bread and place several layers in the oven to cook two or four slices as needed. Today, Cuisinart toa-60 ovens have horizontal electric wires instead of vertical wires as a quick toaster. Cuisinart toa-60 also has a heating function that allows you to heat toast without burning it. The toaster now has a glass door that must be open to remove the removable tray. Due to the design, a Cuisinart toa-60 can also perform certain functions that a conventional oven offers on a smaller scale. That is why bread doughs are far from being toasters. They have become versatile tools. 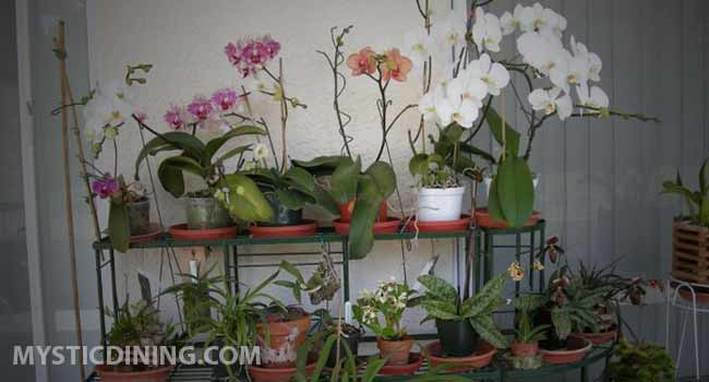 No matter what orchid species you choose, you must have the basic requirements for feeding and waxing. The underlying conditions are soil, irrigation, fertilization and the place where the orchid is retained. There are various Best Orchid Pots for the cultivation of orchids. The Orchid pots containing orchids are made of Plastic Orchid Pots or Terracotta Orchid Pots.
Plastic Orchid Pots: • Plastic Orchid Pots type has some features. First it is light weight . Secondly, Plastic Orchid Pots With Holes, has may be many drainage holes. This type may be more suitable for indoor use. Aviation in nature and usually for people with heaven and soul. • One of the main reasons why Plastic Orchid Pots With Holes is the amazing opportunity (ie, Plastic Orchid Pots). In the plastic jar, the growth weight is reasonably dried slowly for the Terracotta Orchid Pots. It makes it beneficial for that purpose. • Do not insert a store directly and pick Plastic Orchid Pots. From the beach The most recommended Plastic Orchid Pots would be one with thick walls that are not easily broken. Secondly, the Plastic Orchid Pots you choose must be light. Thirdly, he should not heat up quickly. In order to overcome the problem of "rapid heating" clear Plastic Orchid Pots were introduced. They let the light through the roots and reach them. Therefore, these polyethylene Plastic Orchid Pots are beneficial in both directions. Terracotta Orchid Pots: • This type of orchid pot has its own advantages. For example, it is heavy and Large Orchid Pots. So, of course (from beginning to end it's an error: P) clearing a simple blade and you do not change your choice. That means it does not fall now. • Stay! Even more beautiful things are under this orchid plant! (OK, not much, but still.) Terracotta Orchid Pots have a drain hole down. In addition, there are some special orchid pots. • If you want to be kind to orchids, you can benefit from them by placing them in a Ceramic Orchid Pot. The Ceramic Orchid Pot With Holes fit for orchids. And especially if orchids hang flowers or they spread orchids. • The cheaper factor that comes closer to the Ceramic Orchid Pot is the air circulation around the compost and the roots. • But with great power comes great responsibility. It's not easy to put orchids in the Ceramic Orchid Pot, and that's it. NO! You need to take care of orchids. Again nothing else happens on the orchids not dry to Ceramic Orchid Pot As said, you must take responsibility as soon as you put this orchid in the Ceramic Orchid Pot. the Ceramic Orchid Pot must be sure to be sure. Some materials may be useful like cork or bark. Well, this is the exciting part: Take material, connect the plant (use the dishwasher to loosen! E did not mean anyway ... without offending the ladies). Unmarried, from the dead Much, there is no debt; You do not find any difference between the market and the sales products, but you will be until you go home. 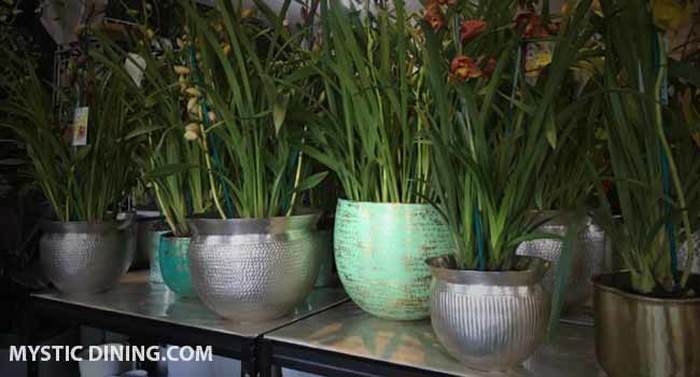 The orchids requirement for an orchid pot is very different from the usual plants which we grow in our houses. Orchids can grow with almost any compost as long as their roots are accelerated regularly. The roots of the orchid should never be filled with water, and an orchid pot may spread around the roots.
You can use different types of orchid pots or orchid jar for your orchid and you do not even need to use a orchid jar. Epiphany orchids can be grown on bark or cork sterilization or a piece of fern fiber. They play this effectively with the habitat of some episodes of orchids. Below is a list of types of orchid pots that you can use for orchid plants. You will find a brief overview of the pros and cons of each type. Ceramic Orchid Pot With Holes: Orchids that absorb moisture and nutrients are through air roots, and those with traceable flowers are suitable for growing Ceramic Orchid Pot With Holes. Common Ceramic Orchid Pot can be use as well. The Ceramic Orchid Pot should have a Sphagnum moss, and then fill it with a suitable mix of orchid compost. Ceramic Orchid Pot are very open orchid pots, so they should be cleaned regularly. For this reason they may not be suitable for your home and better suited for greenhouses or greenhouses. Terracotta Orchid Pots or Clay Orchid pots: The Terracotta Orchid Pots is a suitable container for your orchid because the natural Clay construction is clamped so that the roots of the plants can "breathe" and evaporate water that prevents your roots from getting soaked. The heaviest plants placed in the orchid pot are difficult to bear because of the power's own weight than in Plastic Orchid Pots and Large Orchid Pots. The disadvantage of Terracotta Orchid Pots is that they are more expensive than Plastic Orchid Pots and are not available in a wide range of colors. Plastic Orchid Pots: Plastic Orchid Pots are come in many shapes, sizes and colors. You need to find one that perfects your home environment. They also have the advantage that they are probably the cheapest orchid pot. Plastic Orchid Pots can not dry a compost mix quickly, but on the negative side, you need to take care of water storage because you do not want to fill roots, the main reason for death is. Orchids at home. You can buy transparent Plastic Orchid Pots that allow you to see the state of roots and compost your orchids without interfering with the plant itself. For this reason, many breeders sell their orchids in this kind of orchid pots, as they want to keep the condition of the plants under eye loading and wait for the sale. All ripe orchids must be placed in individual orchid pots. To show some orchids, put these orchid pots into a Large Orchid Pots, which may be the Terracotta Orchid Pots or other decorative Ceramic Orchid Pot. If the external orchid pot has no drainage holes, make sure that the individual pots have enough drainage material as small pebbles or gravel. This prevents orchids from sitting in water. Always make sure you always look in this kind of planting your individual orchid pots from the outer container before washing orchids and repeat it on the screen when the water is squeezed on them. |
